Working with Driveflex Amplifiers
Fulcrum One is the exclusive platform for configuring and managing Driveflex amplifiers. Using one application, on-screen changes are immediately reflected in the simulated models and in the real-world using any number of Driveflex amplifiers.
We recommend you familiarize yourself with the Driveflex Series Product Manual and our general recommendations for Driveflex before integrating Driveflex amplifiers into your system.
We also recommend watching our Getting Started video (below) which will walk you through setting up a simple stereo system powered by a single Driveflex amplifier.
Managing Driveflex Amplifiers
Physical amplifiers on the same network as One may be viewed and managed by either clicking the Device Settings button on the home screen or by clicking the "+" icon in the amplifier section of the Devices toolbox. A list of amplifiers online in the same network as the Fulcrum One computer will be displayed. Note that by default, Driveflex amplifiers will attempt to obtain an IP address via DHCP and will automatically revert to a zero-configuration address if no DHCP server is available.
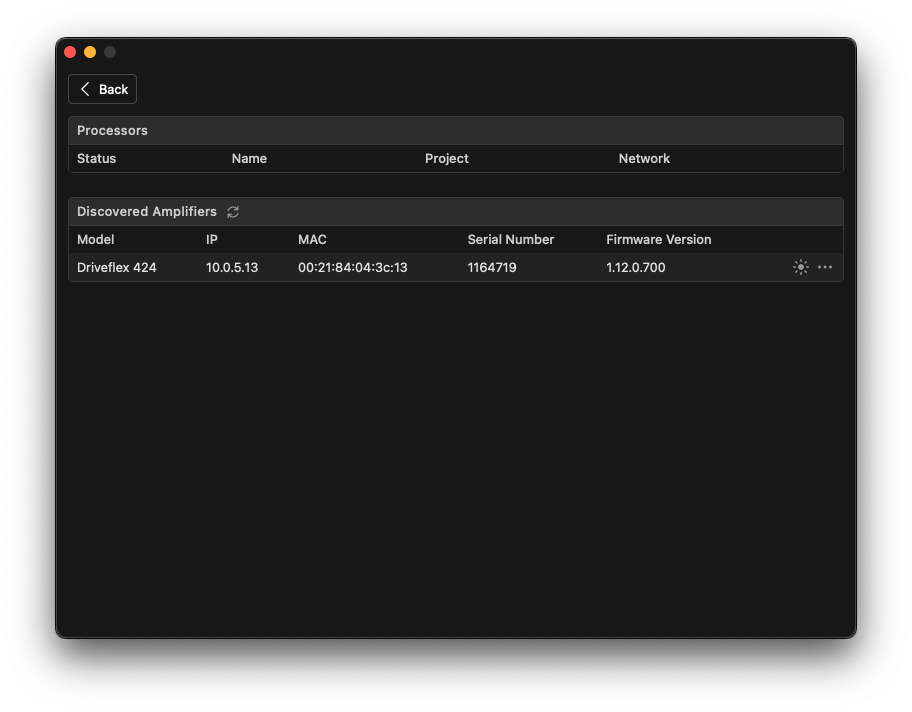
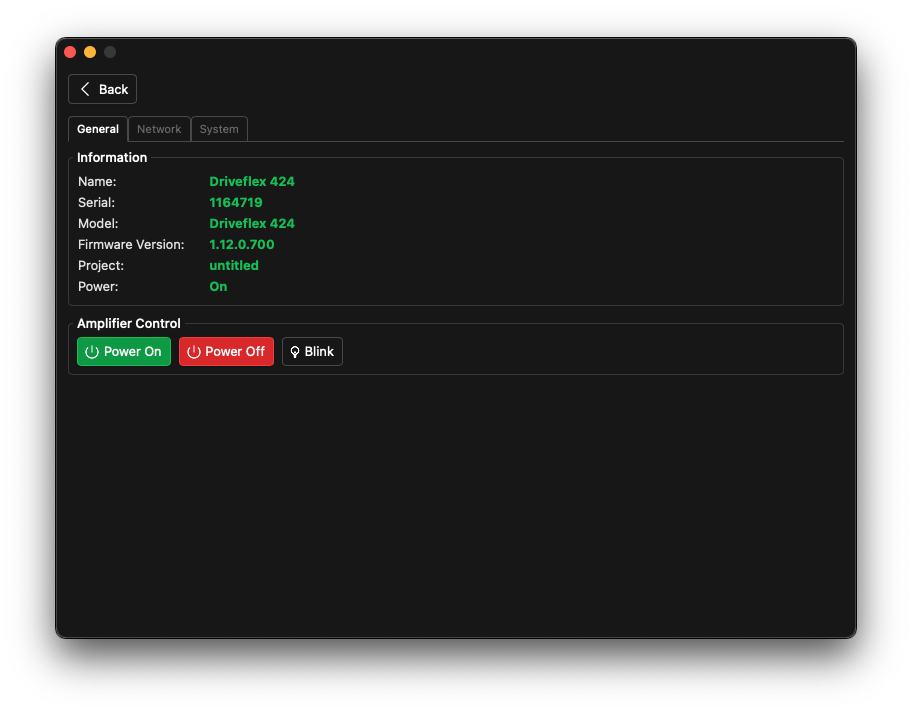
Click the ellipsis to view each amplifier's properties window, which allows you to view and adjust various device properties. On the General tab, you can see the amplifier's name, serial number, model, and firmware version. You may also view the project name if the amplifier is currently associated with a project.
Under Amplifier Control, you may power on and off the amplifier remotely and also use the Blink function to identify the physical unit. The Blink function will cause the front panel LED to flash for easy identification of the unit in a rack.
Configuring Network Settings
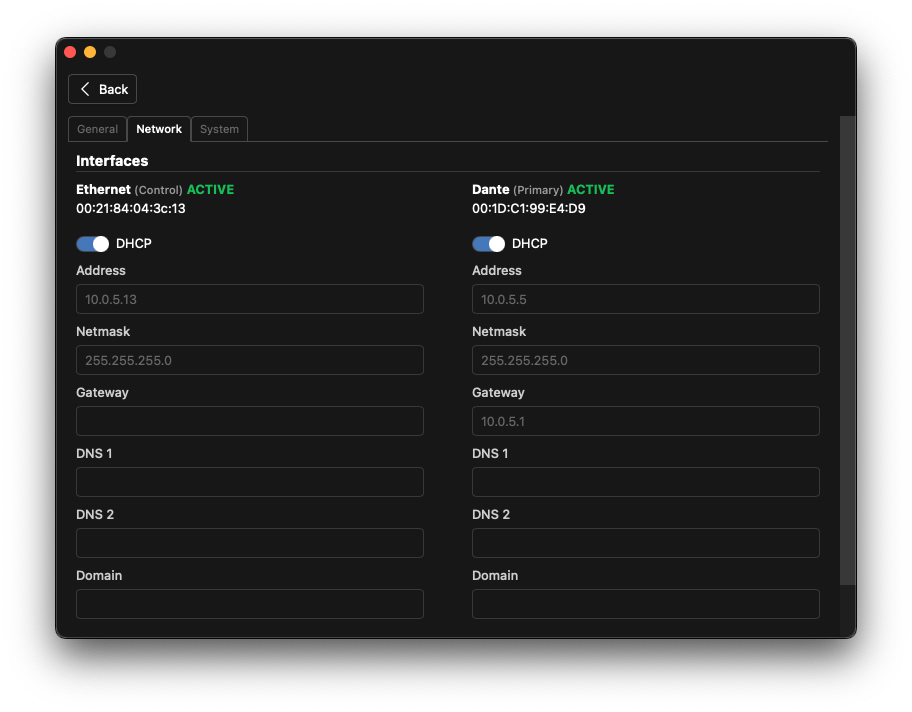
Click the Network tab to set the IP address of the network interfaces on the amplifier, available for both the Ethernet (control) and Dante network interfaces. By default, the amplifier will attempt to use DHCP to obtain an IP address and will automatically revert to a zero-configuration address if no DHCP server is available. If a static IP address is needed, uncheck the DHCP box and enter the desired IP address, subnet mask, and gateway. Note, if using external control interfaces, the use of a static IP address or a DHCP reservation is recommended.
System Settings
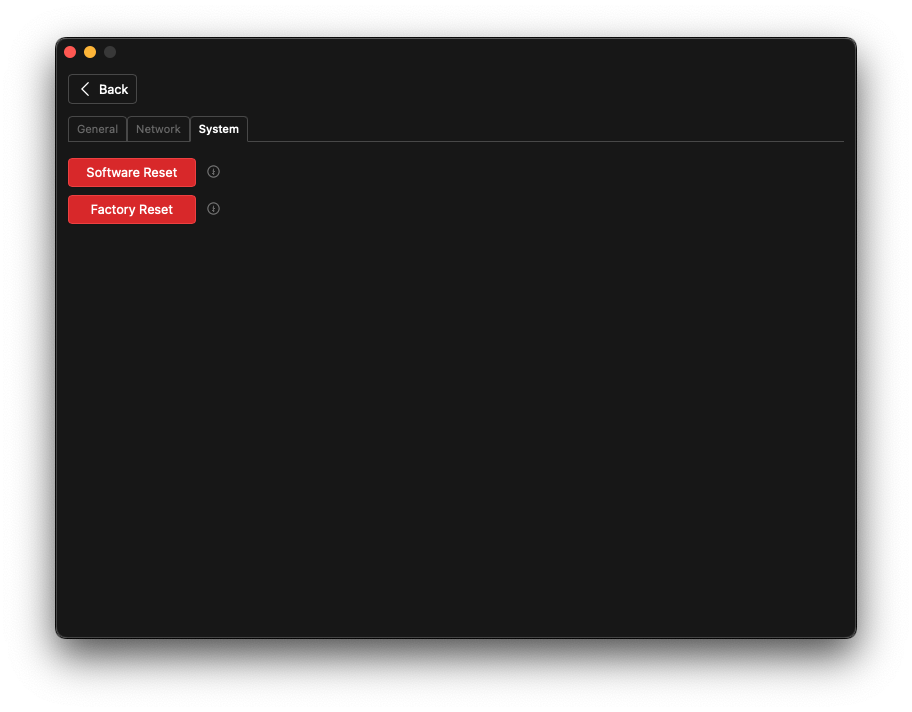
The System tab allows for resetting the amplifier using either the Software Reset or Factory Reset functions.
- Software Reset will reset the amplifier's audio signal path without changing any network or Dante settings.
- Factory Reset will reset all settings to factory defaults, including network and Dante settings.
Adding Amplifiers to a Project
Access the Devices toolbox by clicking the  icon on the left side of the window. A new amplifier may be added by clicking the + beside the Amplifiers list.
 icon on the left side of the window. A new amplifier may be added by clicking the + beside the Amplifiers list.
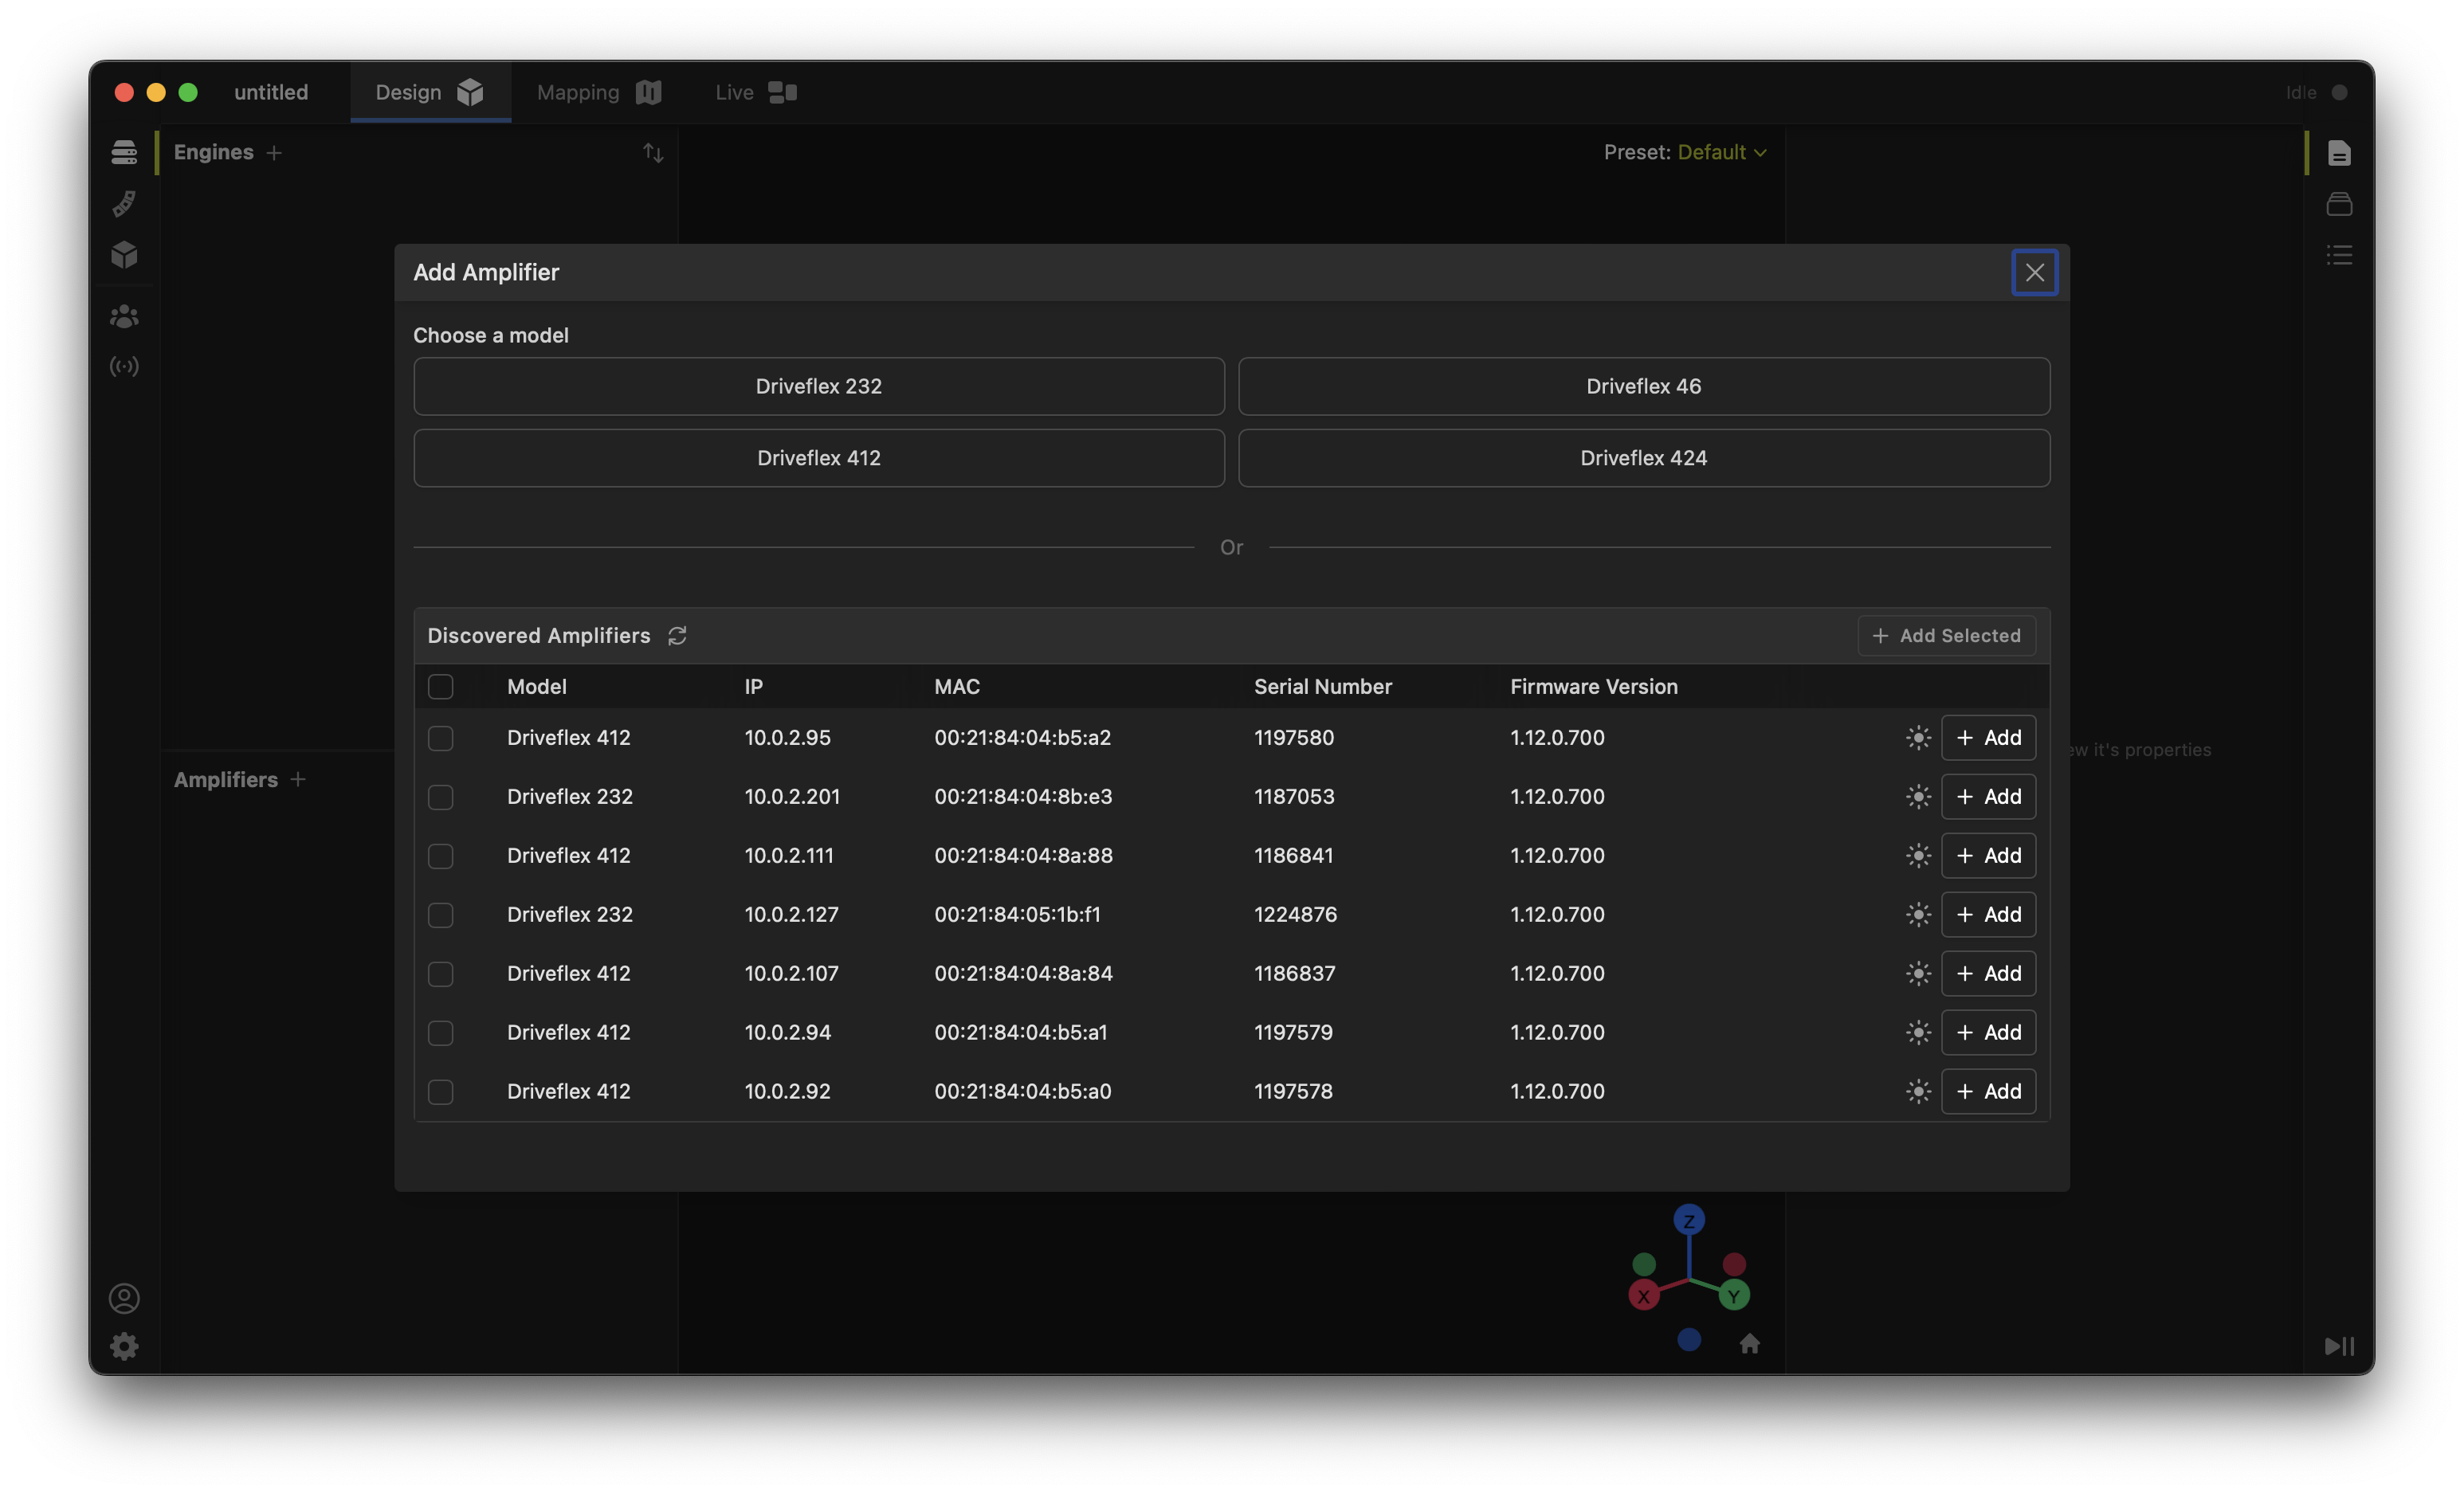
From this window you can easily add either offline virtual amplifiers or existing online physical amplifiers to your project.
-
Add a new offline Driveflex amplifier to the project by selecting the desired model from the list on top of the window. This will add a virtual amplifier to your project that you can use for design purposes. You can link this virtual amplifier to a physical amplifier later.
-
Add existing online Driveflex amplifiers to the project by selecting from the list of available devices on the network using the checkbox. This will add the selected physical amplifier to your project and One will attempt to connect to the amplifier. If you aren't sure which amplifier is which, you can use the Blink function in the device properties window to identify the physical unit. You may also add multiple amplifiers at once by selecting more than one checkbox from the list and clicking Add Selected.
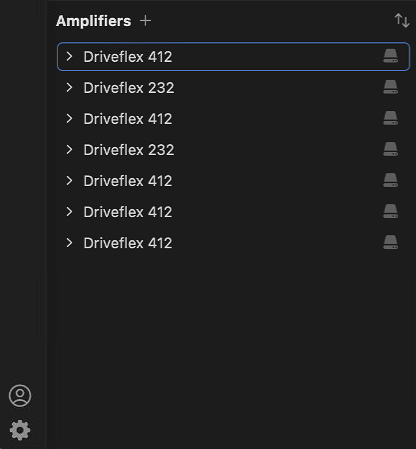
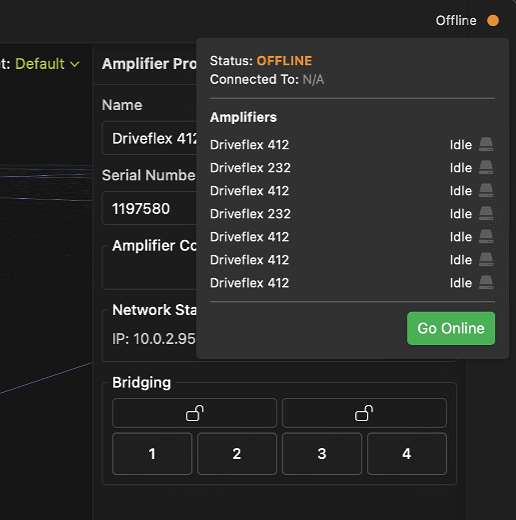
Once an amplifier is added, the Amplifiers list in the Devices toolbox shows the newly added devices which can be configured and managed. The online status of each amplifier is shown by the icon to the right of the amplifier name; a green icon indicates the amplifier is online, a gray icon indicates it is offline (Idle).
After adding online Driveflex amplifiers, Fulcrum One will ask if you wish to go online and synchronize the project with the physical amplifiers.
Linking Physical Amplifiers
To link a physical amplifier to an offline virtual amplifier in the project, the amplifier must be online and discoverable in the same network as Fulcrum One. Follow these steps:
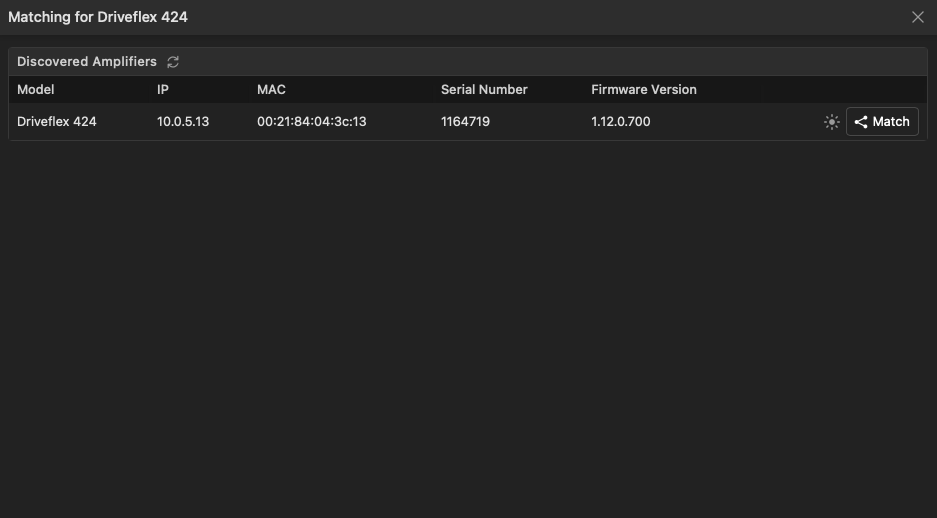
- Select the desired virtual amplifier in the Amplifiers list. In the Properties toolbox on the right side of the window, click the Match button.
- In the Match Amplifier dialog, select the desired physical amplifier from the list of available devices on the network. You may use the Blink function in the device properties window to identify the physical unit if needed.
Going Online and Synchronizing
Once all desired amplifiers have been added to the project, you may go online and synchronize the project with the physical amplifiers. Hover over the "Offline" indicator in the top-right corner of the project window and click the Go Online button:
Fulcrum One will attempt to connect to all physical amplifiers in the project and synchronize the DSP configuration, signal routing, and processing settings. If any amplifiers currently have settings that differ from the project, you will be prompted to overwrite those in the Amplifier Synchronization dialog:
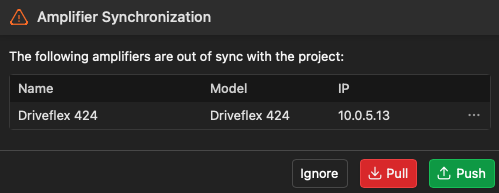
Click one of the following options to proceed:
-
Ignore: The problematic amplifiers will remain offline and no changes will be made to their internal settings.
-
Pull: One will attempt to read existing settings from the amplifier into the project. (Functionality coming soon)
-
Push: The current project settings will be sent to the amplifier and will overwrite any conflicting settings. (Recommended)
You may also click the ellipsis (...) to select a custom option for each amplifier individually.
Once the synchronization is complete, the "Offline" indicator will change to "Online" and the icon beside each amplifier in the Amplifiers list will turn green. The project is now fully synchronized with the physical amplifiers and any changes made in the project will be reflected in the amplifiers in real time.
Amplifier Properties
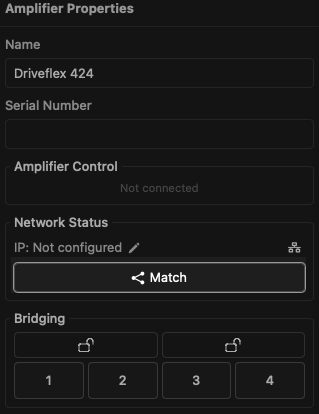
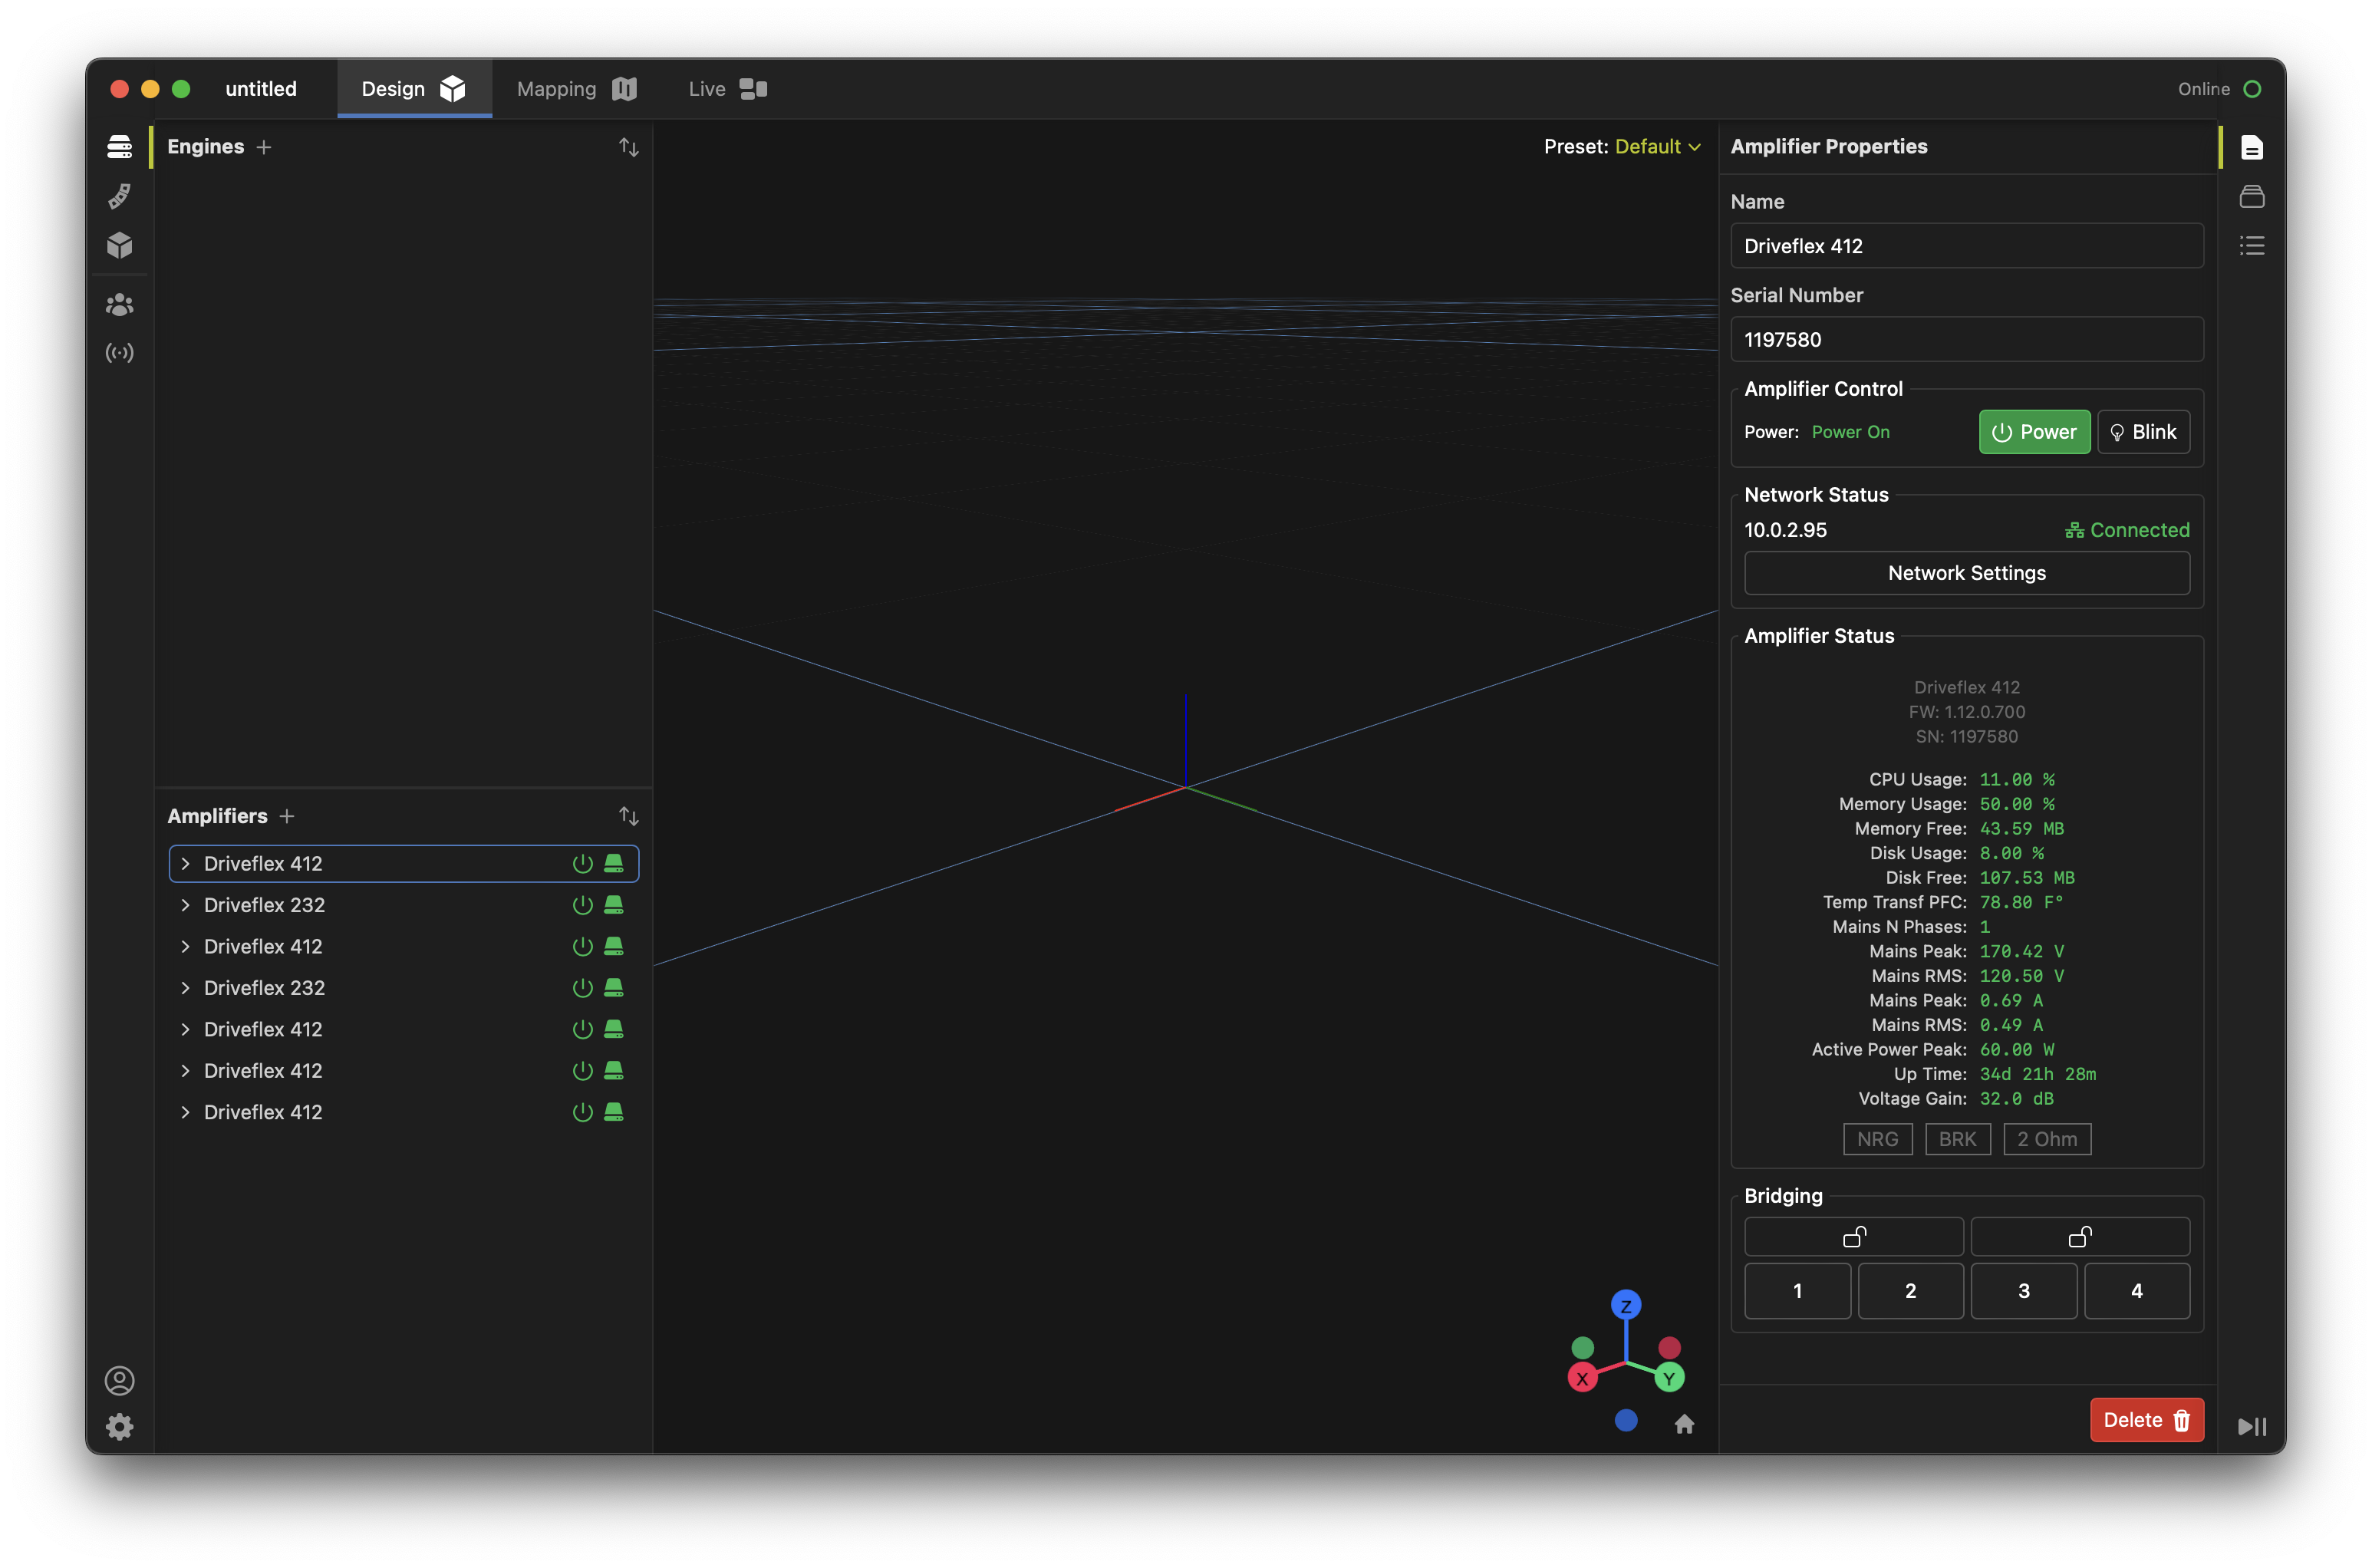
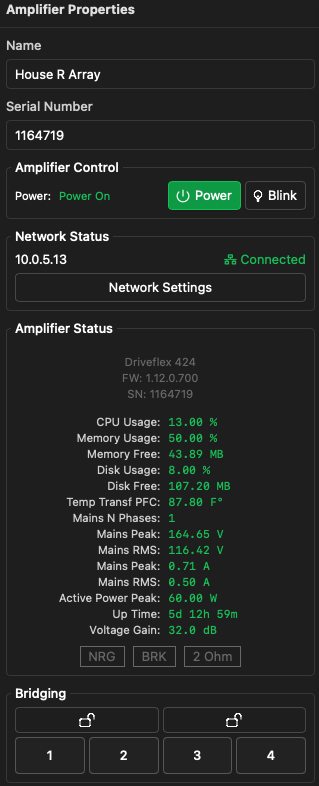
Clicking on an amplifier in the Amplifiers list will show its properties in the Properties toolbox on the right side of the window. Different properties are shown depending on whether the amplifier is online or virtual, including:
- Name: Set the user-defined name for the amplifier. This will default to the model name but can be set to any string to help identify it within your system.
- Serial Number: The serial number of the amplifier. This is variable allowing the user to substitute different amplifiers to accommodate system changes or failures.
- Power: Indicates the power state of the amplifier and allows the user to toggle between on and standby.
- Blink: Causes the front panel LED to blink for easy identification of the physical unit.
- Network Settings: View and modify the network settings of the amplifier, including static IP address configuration.
- Amplifier Status: A large data block showing the amplifier model number, firmware and serial number information, real-time status, and the positions of the global DIP switches on the amplifier chassis (Voltage Gain, Energy Save, Breaker Save, 2Ω, etc).
- Bridging: Allows the user to bridge amplifier channels directly from the properties window. Clicking the lock icon will join two channels into a bridged pair, following a confirmation dialog. Bridged channels will automatically have their gain structure adjusted to match non-bridged channels.
Note that other information and alerts may be shown in the Amplifier list via an icon. Hover over the icon to see detail of potential issues, including mismatch of the amplifier gain from the project/model gain, channel configuration indications, sleep status and amplifier thermal warnings.
Input Configuration
Once a Driveflex amplifier is added to a project, you may expand the amplifier in the Amplifiers list to view its input and output channels. Clicking on the  icon on an input channel will show its processing channel strip.
 icon on an input channel will show its processing channel strip.
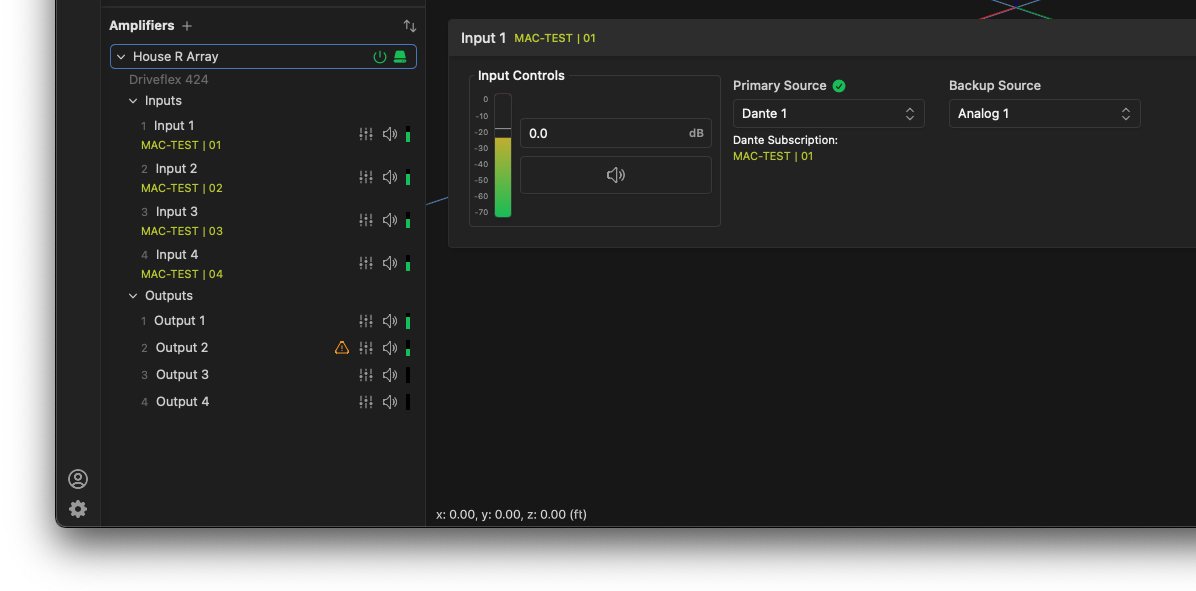
For every input channel, you may configure an input gain trim, a mute, and view its signal level meter. Analog signals will be shown in dBu while Dante signals will be shown in dBFS.
You may also assign the primary and backup input source for each channel. By default, all channels are assigned to Dante as the primary source with no backup source. You may change either of these by clicking the dropdown and selecting the desired source for the input channel. Primary/backup failover is automatic and based on signal presence.
For Dante sources, the input signal subscription is also shown in the Amplifiers list and the channel strip view.
Output Configuration
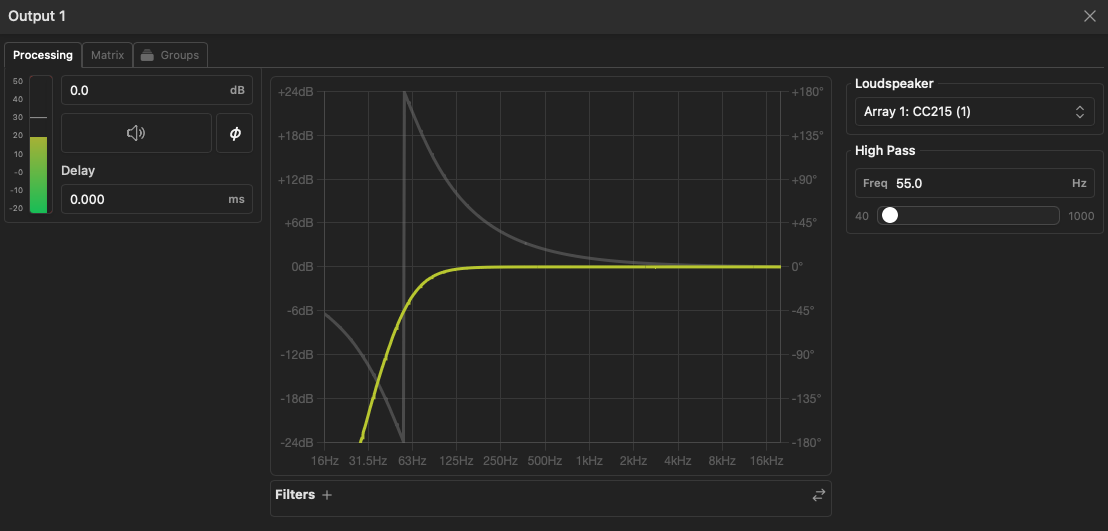
By default, the outputs are not connected to modeled speakers in your project, so the amplifier can be used independently of any speaker presets to manually process third party systems. Clicking on the icon on an output channel will show its processing channel strip.
On the Processing tab, you may configure the following:
- Output Gain: A trim applied to the output channel.
- Mute: Mutes the output channel.
- Polarity: Inverts the polarity of the output channel.
- Delay: Applies a delay to the output channel in milliseconds or feet/meters.
- Signal Meter: A real-time signal level meter for the output channel in dBu and Volts, with an overall limiter indicator.
- FIR: Manually load a custom FIR filter to the output channel. You may load a .csv file containing up to 2048 taps.
- Filters: Add equalization filters directly to the output channel.
- High Pass/Low Pass: Apply a high-pass or low-pass filter to the output channel.
- Loudspeaker: Assign a speaker in the One model to the output channel. This will automatically load the appropriate processing preset for that speaker (more below).

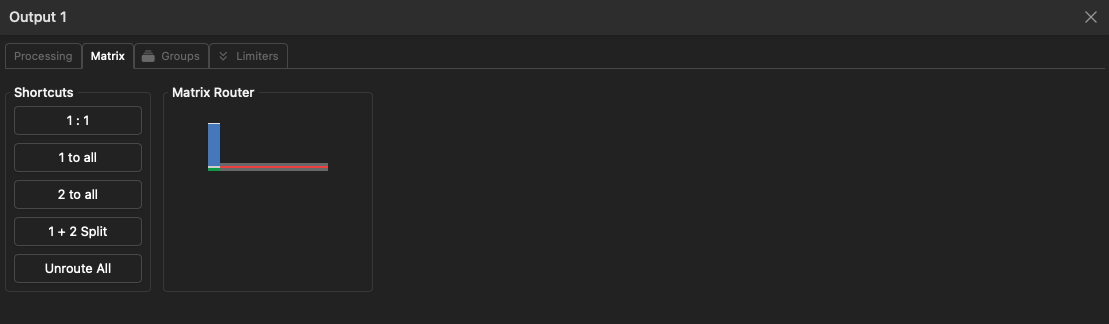
On the Matrix tab, you may route any input channel to any output channel with independent gain and mute at each crosspoint. Several presets are available to simplify common routing configurations.
On the Groups tab, you may assign the output channel to any number of groups created in the Groups toolbox. This allows for easy control of multiple outputs at once. Note, groups assigned to an amplifier output may only be assigned to other output channels (not speakers, arrays, inputs, etc.).

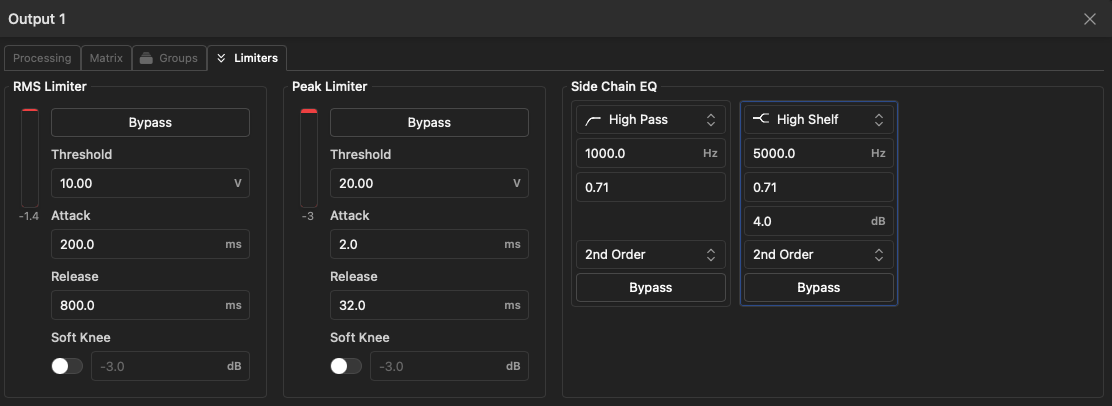
On the Limiter tab, you may view and adjust the output channel's RMS and peak limiter settings as well as side-chain EQ for the limiter detector to support third-party loudspeakers. This tab is disabled when a Fulcrum loudspeaker is assigned to the output channel as the limiter settings are automatically managed by the speaker preset.
Connecting Fulcrum Acoustic Loudspeakers
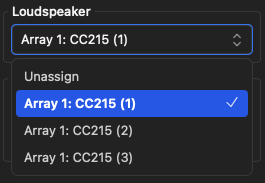
For most designs, you will want to connect modeled speakers in your project to the outputs of the Driveflex amplifier. This will automatically load the appropriate processing preset for that speaker, including crossover, equalization, and limiting settings. To connect a speaker to an output channel, click the dropdown under Loudspeaker in the output channel strip and select the desired speaker from the list.
Most Fulcrum loudspeaker presets include a user-variable high- or low-pass filter setting which can be adjusted directly from the output channel strip. This may be adjusted based on the specific installation requirements during system tuning.
Note all loudspeaker and loudspeaker-group EQ settings will be automatically applied to the output channel when a speaker is assigned. As a matter of best practice, we recommend using equalization filters primarily on the loudspeaker and loudspeaker groups when tuning a system.
Patching Arrays
Individual array boxes may be patched to amplifier channels by choosing the box by index (lowest being the top-most box in the array).
In addition to loudspeaker and group EQ, any array optimization that has been applied to the array will also be automatically applied to the output channel when a box is assigned. Array optimization will also be dynamically updated on the output channel if the array is re-optimized in the design as long as Fulcrum One is connected to the amplifier.
Performance Limitations
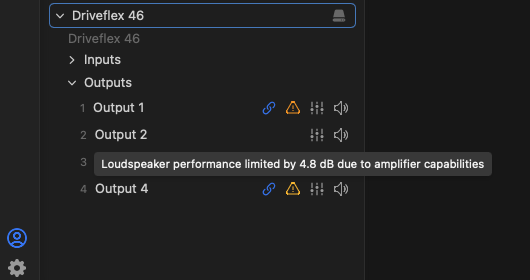
When using Fulcrum loudspeakers, Fulcrum One dynamically modifies output limiters based on the capacity of the amplifier. If the amplifier cannot deliver the full rated power of the loudspeaker, Fulcrum One will automatically adapt limiter thresholds to prevent overdriving the amplifier.
When a reduction in available power is detected an icon will appear beside the output channel in the Amplifiers list. Hover over the icon to see the details of the performance limitation.
This indication is available for both online and offline amplifiers allowing you to verify that your amplifier selection is appropriate during the design phase.