Automation
Fulcrum One's Automation system can be used to create Sequences, which are collections of related Cues that can be triggered both manually in the software or via external control interfaces. Sequences can be used to automate object-based mixing parameters, active acoustics processing, and other system functions.
Creating Sequences and Cues
Click the  icon at the bottom-right corner of a project window in One to open the Automation screen.
 icon at the bottom-right corner of a project window in One to open the Automation screen.
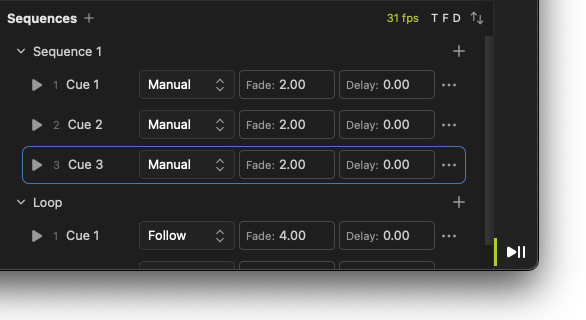
The Automation screen shows a nested list of Sequences in the project, with each sequence's Cues listed underneath. The options available at the top of the window are as follows:
- + Adds a new sequence to the project.
- T Show/hide the cue Trigger options, which allows either manual or follow options.
- F Show/hide the cue Fade option, which allows for a fade time between states to be set for the cue.
- D Show/hide the cue delay options, which allows for a delay time before the cue is executed.
 Allows you to reorder sequences in the list.
 Allows you to reorder sequences in the list.
Click the + button to add a new sequence to the project. You may rename the sequence by hovering over the name and clicking the pencil icon that appears. Click the + button next to the sequence name to add a new cue to the sequence. The Add Cue dialog will appear as below:
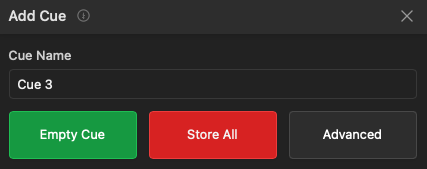
If desired, change the cue name to a descriptive name; this can be edited later by hovering over the cue name and clicking the pencil icon. The cue name can be used for descriptive purposes and can also be referenced using the external control interface. Three options exist for adding the cue represented by buttons at the bottom of the dialog box:
- Empty Cue creates a placeholder cue that can be edited later.
- Store All captures the entire current state of the OBM and active acoustics system and stores it in the cue.
- Advanced allows you to selectively store only certain parameters in the cue.
When using the system as a simple scene controller, the Store All option is the most straightforward. Click the Store All button to capture the current state of the system in the cue.
If you wish to selectively include specific parameters in the cue, click the Advanced button. This will open a new dialog, which allows you to select which parameters to include in the cue. Currently, you may include specific object-based mixing sources, source parameters, and active acoustics presets and source sends.
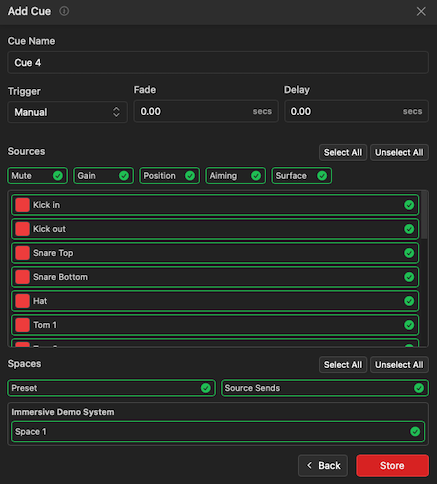
Once the desired parameters are selected, click the Store button to capture the selected parameters in the cue.
Cue Playback and Properties
When a sequence is expanded, each cue is shown with a control bar as below (note some parameters may be selectively hidden using the controls at the top of the window):

- Press the
 button at any time to manually trigger the cue. A progress bar will appear below the cue showing that it is running. Press the
  button to stop playback.
 - You may edit the cue name by hovering over the name and clicking the pencil icon. The cue name can be used for descriptive purposes and can also be referenced using the external control interface.
- From the drop-down box, select either Manual or Follow to set the cue trigger mode. Manual cues must be triggered manually, while Follow cues will automatically trigger when the previous cue is completed.
- If desired, set the Fade time for the cue. This will execute the cue with gradual changes over the specified time. The fade curve can be set for each parameter but defaults to a linear fade (more on this later).
- Optionally, set the Delay time for the cue. This will delay the execution of the cue by the specified time.
 button at any time to manually trigger the cue. A progress bar will appear below the cue showing that it is running. Press the
  button to stop playback.
Selecting a cue with the mouse and opening the Properties Toolbox using the  icon on the right side of the window will show the parameters that are stored in the cue. You can edit properties or remove parameters from the cue using the
  icon beside a parameter group.
 icon on the right side of the window will show the parameters that are stored in the cue. You can edit properties or remove parameters from the cue using the
  icon beside a parameter group.
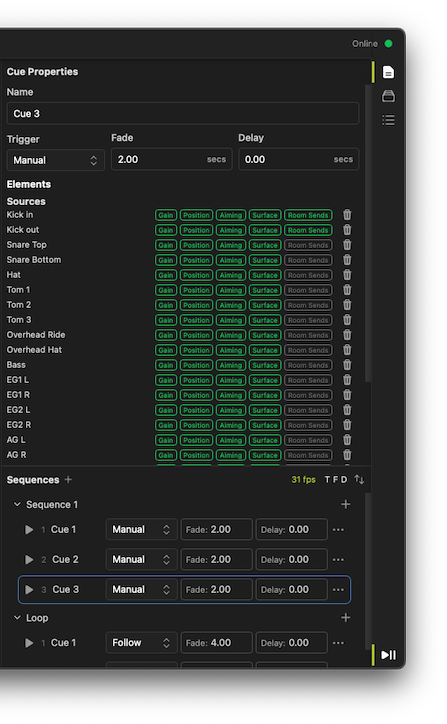
Sequences may also be selected in the list, and their properties viewed and edited in the Properties Toolbox by clicking the icon on the right side of the window.
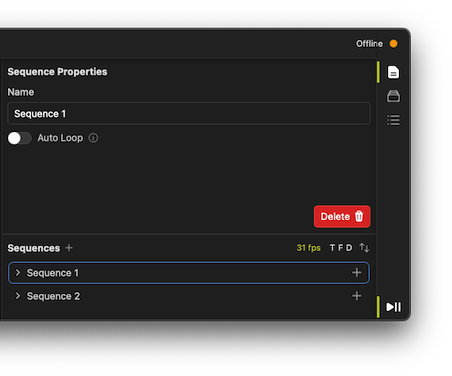
Note, in the Sequence Properties window, an Auto Loop option is available. When enabled, the sequence will automatically loop back to the beginning after the last cue is executed. This is useful for creating a continuous loop of cues for an effect.
Updating and Editing Cues
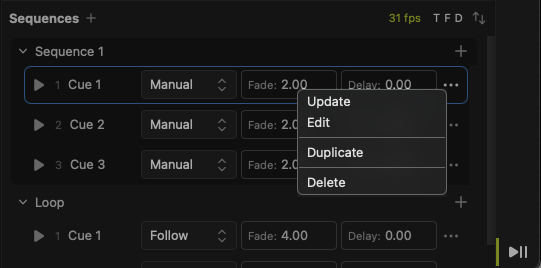
At any time, ellipsis "..." beside a cue to access a menu of cue editing options. The options available are as follows:
- Update: This option allows you to update the cue from the live state of the system. This action captures the current values into the cue, overwriting only the parameters originally stored in the cue itself and ignoring any parameters not stored originally. This is helpful for updating mix parameters with the present state of the system.
- Edit: This option allows you to edit the cue in blind mode, which permits edits to cues without affecting the current audio. See additional information below.
- Duplicate: This option allows you to duplicate the cue in the sequence, which can accelerate the creation of related cues.
- Delete: This option allows you to delete the cue from the sequence.
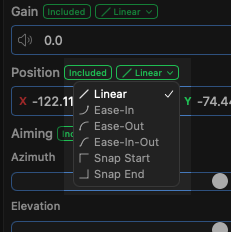
Editing Cues (Blind)
In addition to updating cues from the live state of the system, Fulcrum One allows blind editing, which permits edits to cues without effecting the current audio. To edit a cue, Edit option from the cue editing menu. The cue in question will show the message (Editing) in the list and the entire Fulcrum One window will change to a blue color, indicating you are in cue edit mode. At any time, you may accept or cancel the editing mode using the ✓ or ✗ buttons located at the top of the window and beside the cue name.
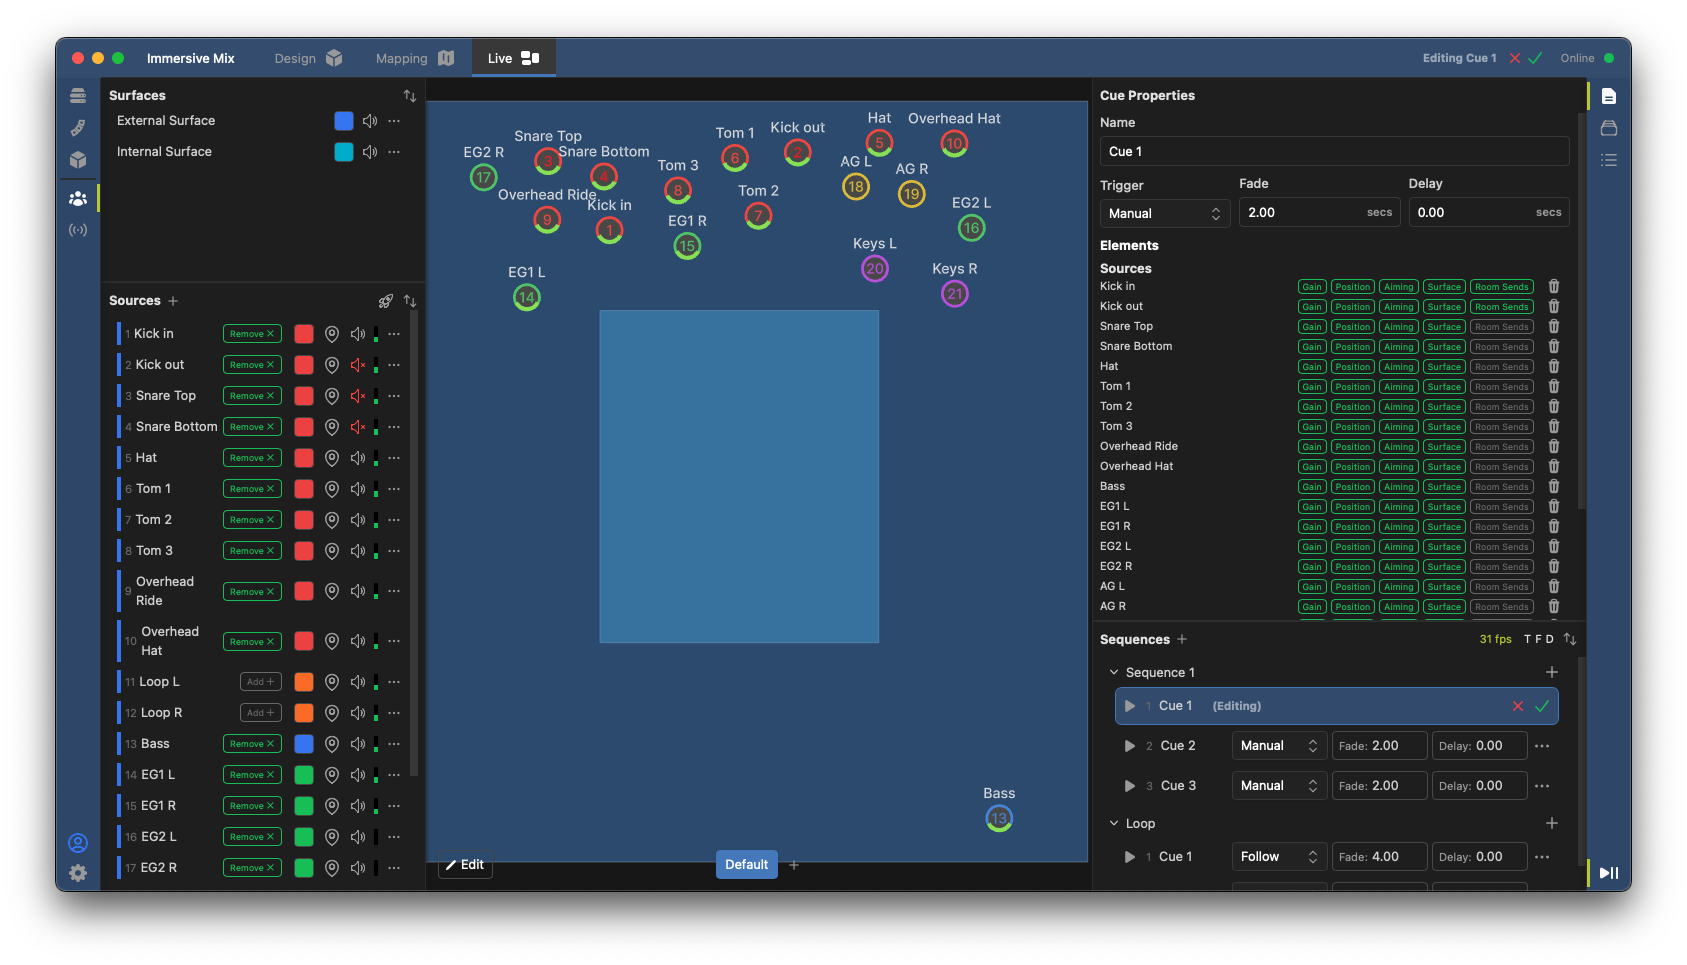
When editing a cue, objects may be moved or levels adjusted to create the desired effect. Note that changes will not be audible until the cue is saved and triggered. In addition to parameter changes, specific objects and parameters may be included or excluded from the cue using the Properties Toolbox and adjusting the controls marked Included beside a parameter. Some parameters also allow the adjustment of their fade curve, which can be set to Linear, Ease, or Snap options.
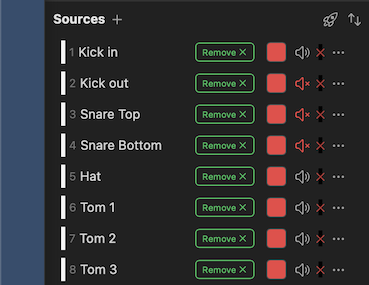
Specific sources may be included or excluded from the cue using the Add and Remove controls in the source list.